
There’s a certain irony in spending what a Hasselblad costs, then pulling out an iPad to edit the files.
People expect a workflow that looks like a dedicated editing suite. Dual monitors. Color-calibrated display. A full desktop setup that signals you take this seriously.
But for me, that’s not how photography actually happens. My life doesn’t sit still long enough for that.
I travel a lot. I shoot landscapes, architecture, city scenes. I’m not in a studio — I’m in airports, hotels, and places where my MacBook Pro doesn’t always come out of the bag. So when I built a workflow around the Hasselblad X2D II 100C, I made a deliberate choice early on: iPad first, Mac when it matters.
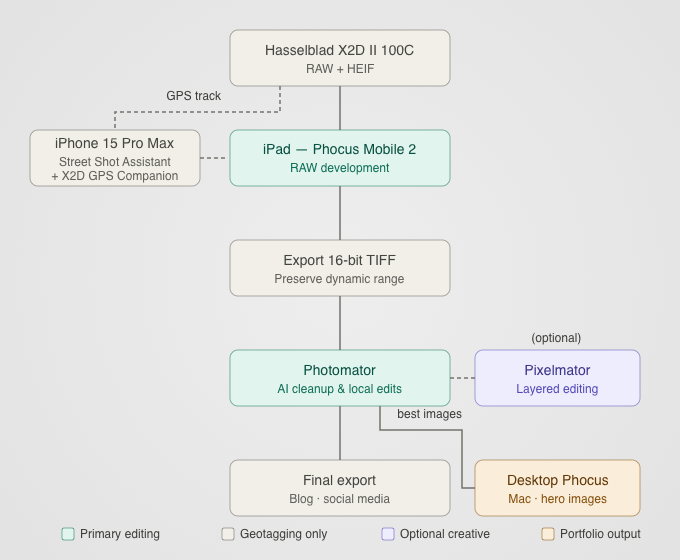
This is how that workflow actually plays out across my devices.
The Setup
Before getting into the steps, here’s what I’m working with:
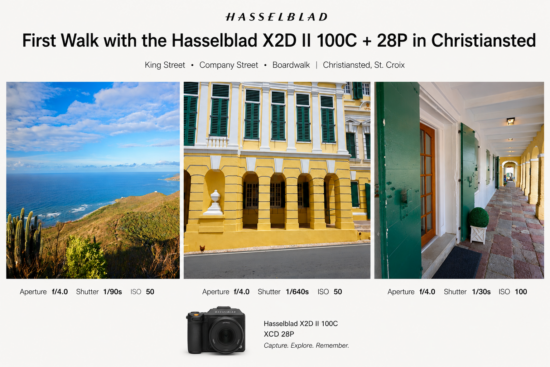
- Hasselblad X2D II 100C with the XCD 28P lens
- iPhone 15 Pro Max — geotagging companion in the field
- iPad Pro 13-inch (M4) — my primary editing environment
- MacBook Pro 14-inch (2021) — for final portfolio and print work
The goal from the start was to make the iPad do as much of the heavy lifting as possible. Not because I think the Mac isn’t capable — it obviously is — but because the iPad is with me more often. It’s lighter, it works well in natural light, and it doesn’t need a desk.
Step 1: Capturing Location Data on the iPhone
The X2D II 100C doesn’t have built-in GPS. That’s a known limitation, and for most casual shooting it doesn’t matter. But for travel photography — where location context is part of the story — it matters to me. My workaround: while I’m shooting, I run two apps on my iPhone 15 Pro Max.
Street Shot Assistant is a feature in the Phocus Mobile 2 app which, when enabled, will keep running in the background, and images are automatically downloaded once being captured (only available for HEIF and JPG images. X1DII and CFV II 50c are not supported).
X2D GDS Companion handles the geotagging itself — matching the GPS track from the moment hte photo was added to the Photos app on iPhone.
This happens before any editing starts. Once location data is attached. The iPhone isn’t doing any image editing in my workflow. It’s purely the location layer.
Step 2: Primary Editing on the iPad Pro
This is where the actual work happens.
One thing worth knowing about Phocus Mobile 2: it has no iCloud sync, or any cross-device sync at all. If you connect the X2D II to your iPhone and import images there, those files don’t appear on your iPad automatically. You’d have to sync the camera to the iPad separately. There’s no shared library, no background transfer, nothing like that.
This is actually part of why I settled on the iPad as my primary editing device and keep the iPhone out of that side of the workflow entirely. One device, one connection to the camera, one place where the files live. It’s cleaner, and it avoids the confusion of managing imports across two devices in an app that won’t reconcile them for you.
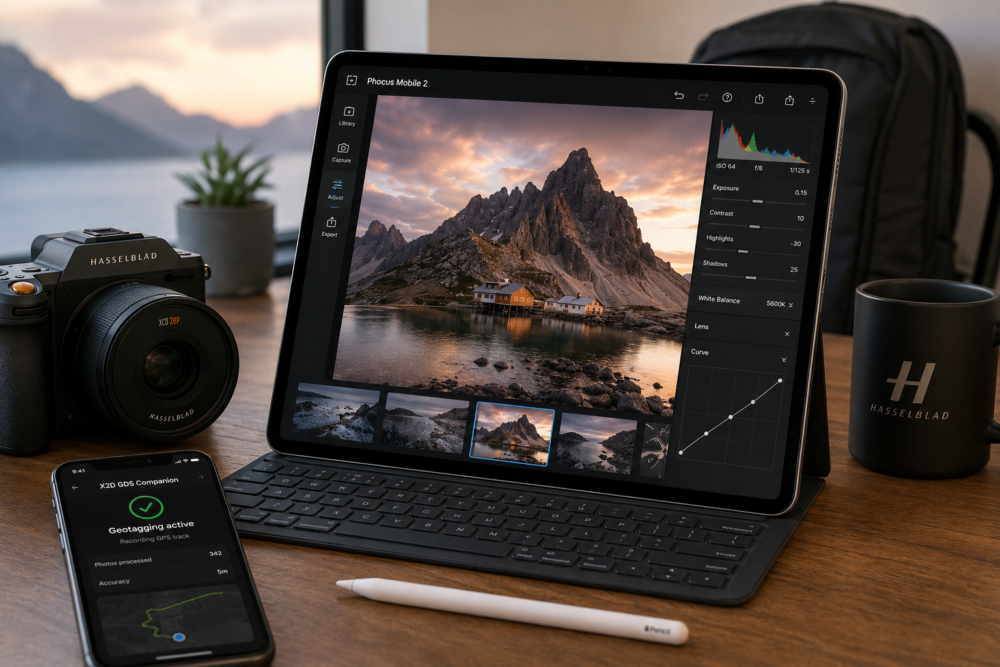
When I get back from a shoot, the RAW files come off and directly into Phocus Mobile 2 on my iPad Pro 13-inch M4. That 13-inch screen matters more than I expected. The X2D II produces 100MP files with a level of detail that you genuinely can’t appreciate on a smaller display. The M4 handles them without complaint.
Phocus Mobile 2 is the right place for initial RAW development specifically because it preserves Hasselblad’s color science. That’s not a small thing. The way the X2D II renders color — particularly skin tones, blues, and the way it handles shadows — is a big part of why I bought this camera. I don’t want to hand that off to a generic processing engine.
In Phocus Mobile 2 I’m handling:
- Exposure and white balance
- Highlight recovery
- Lens corrections
- Perspective and cropping
- Base color rendering
I’m not doing any cleanup work here. I’m not trying to remove objects or do local adjustments. That comes later. This is purely getting the RAW file looking the way I want it to look.
Step 3: Export as 16-bit TIFF
After finishing the initial RAW work in Phocus Mobile 2, I export as a 16-bit TIFF — not JPEG. Even when the destination is social media. Even when the final file will be compressed anyway.
The reason: the X2D II 100C sensor has extraordinary dynamic range. Exporting to JPEG at this stage limits tonal information you can never get back. A 16-bit TIFF keeps everything intact as the file moves into the next stage of editing.
It takes more space. It takes a moment longer to export. Worth it every time.
Step 4: Finishing Work in Photomator
Once I have the 16-bit TIFF, it goes into Photomator on the iPad.
Photomator is where I do the finishing work that Phocus Mobile 2 isn’t designed for. Things like:
- AI-based cleanup and object removal
- Local adjustments and selective edits
- Final color balancing and tone work
- Sharpening and denoise
- Preparing the file for export
I tried doing this in Apple Photos for a while. It didn’t work well. The app introduced HDR-related darkening on some of my Hasselblad files after cleanup passes — something I hadn’t seen with other cameras. Photomator handles these large medium-format files more reliably, and I haven’t had those issues since switching.
For most images, the workflow ends here. I export from Photomator for blog posts and Instagram, with sRGB conversion, appropriate sharpening for screen, and sizing that doesn’t get aggressively recompressed by the platform.
Step 5: The Optional Layer — Pixelmator
For anything that needs layered editing — YouTube thumbnails, blog header graphics, composite images, text overlays — I bring in Pixelmator, also on the iPad.
This isn’t part of my photography editing workflow exactly. It’s more of a design and publishing layer. But it lives in the same environment, which is the point. I don’t have to move to a different device to put together a finished piece of content.
Why Mobile-First Actually Makes Sense Here
The honest answer is that mobile-first works for the same reason I bought a Hasselblad with the 28P lens: portability matters.
It’s easy to design a workflow around ideal conditions. Perfect desk, dedicated display, unlimited time. But that’s not how photography actually happens — especially travel photography. The best workflow is the one you’ll actually use consistently, not the one that looks impressive in a YouTube setup tour.
The iPad Pro M4 is a genuinely capable machine. It’s not a compromise. For 95% of what I need to do with these files, it handles them better than I expected. And for the 5% that needs more, the MacBook Pro is there.
The X2D II is a camera that encourages intentional photography. I wanted an editing workflow that matched that philosophy. Deliberately choosing what goes where. Not defaulting to desktop out of habit.
So far, that’s exactly what this workflow delivers.
One More Things
If you don’t need RAW files, this can be simplified a bit. From Phocus Mobile 2 you can export to the Photos app on iOS/iPadOS (I’d recommend JPF – Full or TIFF – 16 bit). Photomator can read directly from the Photos app and any changes you make in Photomator are synced to the Photos app. And if you have iCloud Photos turned those photos will be synced from your iPad to your iPhone/MacBook/etc.